Microsite Editor
Learn how to create a custom-branded microsite with SaaSquatch's microsite editor.
A SaaSquatch-hosted microsite provides a centralized place for your program’s participants to sign up to your program and access the referral widget. Our microsite editor gives you control over what your end users will see by letting you customize layouts, pages, branding elements like fonts and colors, and even the domain.
We recommend using microsites when your users don’t have a way to register for an account for your program, like if you don’t have an area of your website where your users can log in. They’re useful if you’re running partner or affiliate programs.
🔗 About this document
This document will help you get familiar with the microsite editor. We’ll cover the editor’s interface as well as the layouts, pages, and components that determine your site’s behavior and appearance.
If you haven’t created a microsite yet, then you’ll need to do so in the SaaSquatch Admin Portal first. Our Microsite Quickstart Guide provides step-by-step instructions on how to do this.
Important: Before attempting to set up a microsite, make sure your plan supports one. If you're not sure or would like to talk about upgrading, then reach out to our Success team for details.
If you already have a microsite set up and want to learn more about our customization options, check out our documentation on customizing microsites for help.
Note: If your microsite was created before August 2022, then you might be using an older version of our microsites feature that isn't compatible with the microsite editor. Contact our Success team to see if your microsite is eligible for an upgrade.
🔗 About the microsite editor
The microsite editor allows you to customize the content, appearance, and behavior of your microsite using a visual editor. If you’ve used our widget editor before, you’ll find that the microsite editor feels quite familiar–it has a similar interface and many of the same features.
🔗 Microsite editing interface
The SaaSquatch microsite editor has five main areas:
- Top menu bar
- Canvas
- Left sidebar menu
- Microsite tab
- Add/Edit sidebar menu
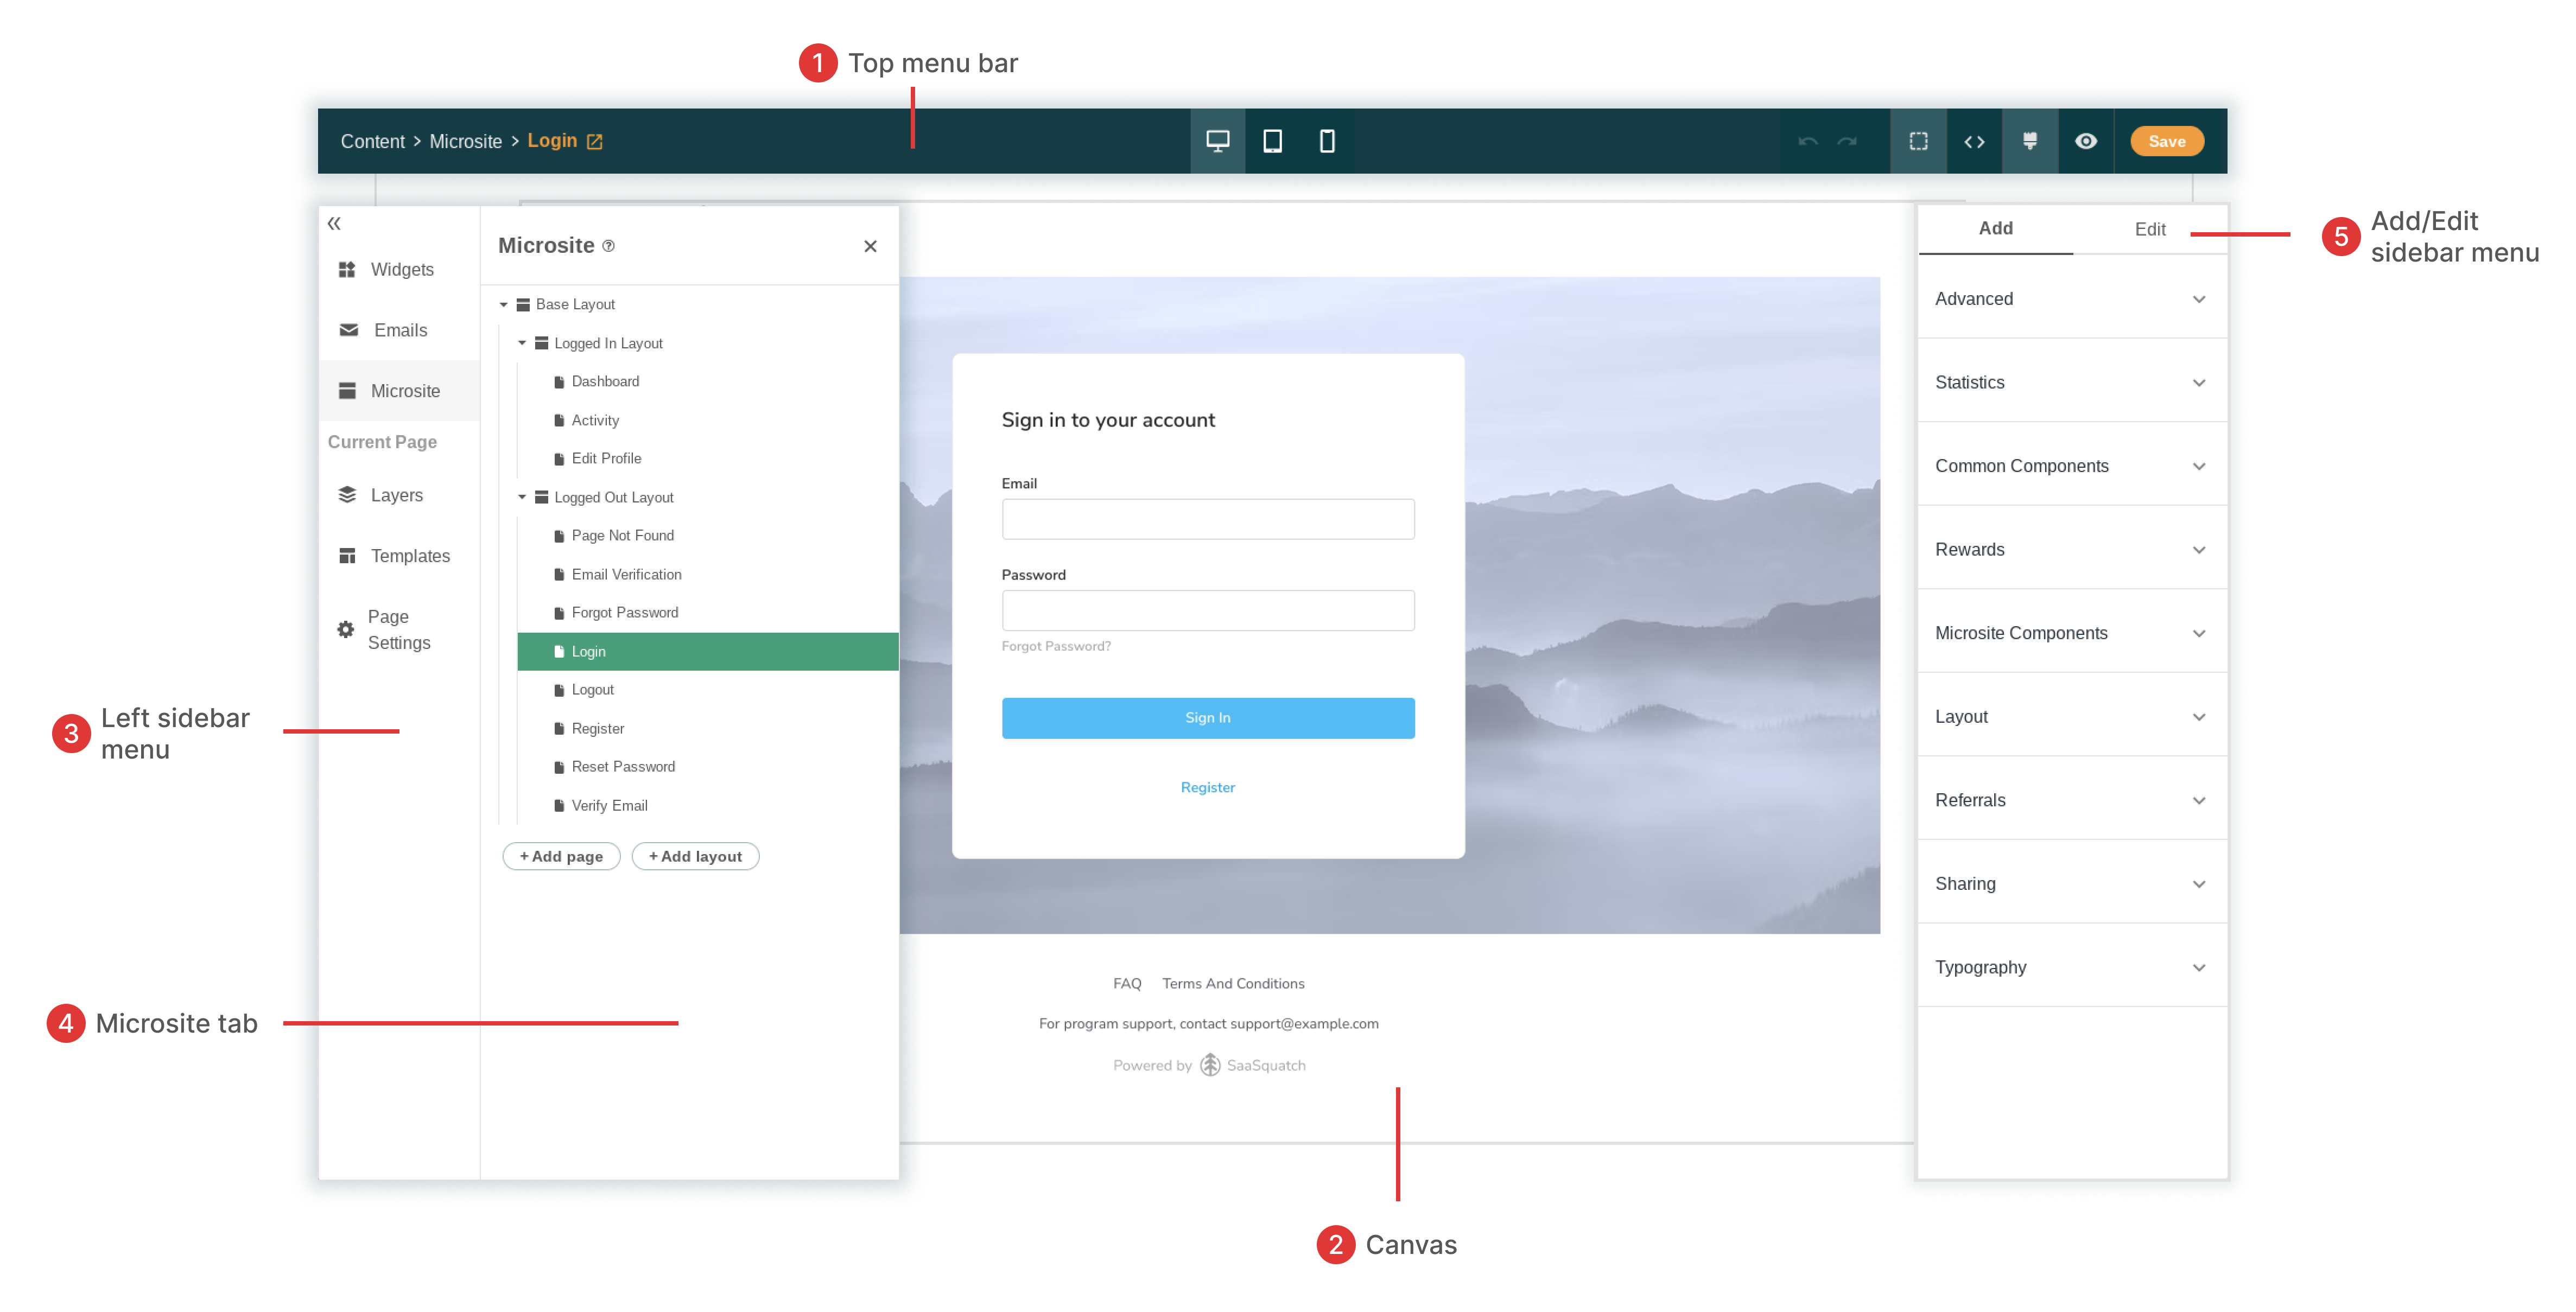
🔗 1. Top menu
The menu bar at the top of the page is where you can undo actions, view the HTML code, and preview the finished microsite. Use the desktop, tablet, or mobile icons to see how your microsite will appear on devices with different screen sizes.
🔗 2. Canvas
The canvas displays the current content of your microsite. You can click individual components to edit them, or add new ones and see at a glance how they'll show up for your participants.
🔗 3. Left sidebar menu
The left sidebar menu is a collapsible panel to the left of the canvas. Use the Navigate submenu to switch between the microsite editor, the email editor, and the widget editor. The second submenu displays options that change depending on whether you’re in a page or a layout.
- Click Layers to see a detailed view of all of the components on your page or layout
- Templates takes you to our template pages, layouts, widgets, and more
- You’ll see a context-dependent third menu based on your selected page, layout, widget, or email
🔗 4. Microsite tab
The microsite tab visualizes the inheritance structure of your layouts and pages as a tree. Click individual layouts or pages to view the content and make adjustments. This is also where you can add more pages and layouts.
🔗 5. Add/Edit sidebar menu
The Add/Edit sidebar menu is a panel to the right of the canvas. Use the Add tab to insert new components into the canvas, and use the Edit tab to make adjustments to what's already there.
🔗 Building blocks
There are a few building blocks that are important to understand as you customize your microsite: layouts, pages, and components. See our guide on customizing microsites for help with creating, modifying, and personalizing your microsite’s layouts and pages.
Info: Layouts and pages are linked through an inheritance structure. Both pages and layouts can inherit a layout. Pages/layouts that have an inherited layout will have their content wrapped by their inherited layouts content. For example, if your base layout contains a header image, any pages that inherit the base layout will display the same header image in the same location.
🔗 Layouts
Layouts act as “frames” for your microsite, and they’re where you can place components that you want to appear pervasively across the microsite, like headers and banner images.
If you used auto setup to create your microsite, then your site has three layouts by default:
- Base layout
- Logged in layout
- Logged out layout
Both the logged in layout and the logged out layout inherit the base layout.
🔗 Base layout
The base layout is where you can place content that you want to appear regardless of which page a user is on and whether they’re authenticated on your site. This is where you can add a header or footer that you want to appear across the site. The base layout also contains the brand container, which manages colors and fonts sitewide.
The logged in layout and logged out layout both inherit the base layout.
🔗 Logged in layout
The logged in layout is where you can add components that all your logged in users will see, regardless of which page they are on. For example, your microsite’s sidebar navigation menu is created through a component in the layout. Because it’s added to the layout, any page that inherits that layout will include that sidebar.
🔗 Logged out layout
The Logged Out layout is where you can customize what any user who is not currently authenticated will see.
🔗 Pages
Pages are where you build the content of your site, like program explainers, referral and sharing information, and text/images. In the Settings under the Current Page submenu, you can choose the page visibility and restrict it to:
- Verified: Logged in users only
- Unverified: Logged in users who have not verified their email address
- Public: Viewable by anyone
If you used auto setup to create your microsite, then your site comes equipped with several pages that inherit the logged in and logged out layouts.
| Inherited Layout | Page |
|---|---|
| Logged in layout | Dashboard |
| Activity | |
| Edit Profile | |
| Logged out layout | Page Not Found |
| Email Verification | |
| Forgot Password | |
| Login and Logout | |
| Register | |
| Reset Password | |
| Verify Email |
🔗 Components
Components are individual elements that you can add to your pages and layouts to further personalize your users’ microsite experience. SaaSquatch’s mint components library powers the microsite editing experience.
We’ve grouped common component types together in the Add/Edit menu so that they’re easy to locate. Check out SaaSquatch Components for a list of what components are available under each category. Our doc on Participant Experiences has you covered if you want to learn more about SaaSquatch component libraries in general.